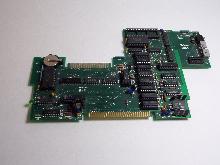
Triple Tech
CorComp Triple Tech card:
What it does
The Triple Tech, as the name implies, is a 3-in-1 card for the TI-99/4a. The card has a real time clock/calendar function that is accessible via BASIC or XB through file commands like Open, Print, etc. The card also has a 64k print buffer that helps in freeing up your computer faster. And finally it has a port, like the Rave99 Speech Adapter, that allows you to take the circuit board from your TI Speech Synthesiser and insert it onto the card and in the PEB.
An interesting side note is that this is one of the first cards that shipped bare, without a clam shell.
Buttons at the back
The Copy and Reset buttons on the back of the Triple Tech card:
The Copy button allows you to resend what's in the print buffer to the printer effectively creating another copy.
The Reset button allows you to clear the buffer. If pressed during printing it stops the printing.
Relocating the Copy and Reset buttons
There is an article in the March 1986 issue of Micropendium that describes moving the buttons. The Triple Tech card that I purchased 2nd hand has four pins off the back of the card and the previous owner created a two button box with wiring that hooks up to it. The little box sits in front of my PEB box and I activate those two buttons now without reaching behind my PEB. This is great for cancelling big print documents.
Connecting a printer
Connecting a printer to the print buffer on the Triple Tech card:
There is a patch cable that comes with the Triple Tech card. The cable goes between the Triple Tech and the PIO (Parallel) port on your RS232 card/device. Your printer then plugs into your Triple Tech thus putting the card in the middle to perform buffering: RS232/PIO ---> Triple Tech ---> Printer
On card battery
An article published in the July 96 issue of Micropendium mentions that there seems to be a current going to the battery (charging it) which can't/shouldn't be done and advised of a fix for this issue.
The fix for this problem is to remove the 100-Ohm resistor at R7 and replace with a diode. It notes that the annode side must face the battery holder.
