Difference between revisions of "Setting up the Horizon Ramdisk"
| Line 1: | Line 1: | ||
The Horizon Ramdisk 4000 can be emulated within MESS/MAME 16MiB of SRAM | The Horizon Ramdisk 4000 can be emulated within MESS/MAME up to 16MiB of SRAM. The data that is stored on the RAM Disk is actually saved in the '''"\nvram\ti99_4a"''' directory within a file. | ||
'''Note: The directory is usually classified by the current machine type being emulated''' | '''Note''': The directory is usually classified by the current machine type being emulated. If you use the European version, your directory will be ''nvram/ti99_4ae''. | ||
The emulation will respond to the equivalent speed of the ram disk on actual hardware. | The emulation will respond to the equivalent speed of the ram disk on actual hardware. | ||
| Line 7: | Line 7: | ||
This process was created using MAME0176b 64bit and ROS version 8.32e. | This process was created using MAME0176b 64bit and ROS version 8.32e. | ||
'''Note: If using ROS 8.14f or earlier, sector sizes will be limited to 1600. ROS 8.32 and higher allows for 3200 sectors per disk. | '''Note''': If using ROS 8.14f or earlier, sector sizes will be limited to 1600. ROS 8.32 and higher allows for 3200 sectors per disk. | ||
== Procedure | == Procedure == | ||
* Boot into ''MAME'' and the ''TI-99/4A ROM'' | |||
* Bring up the ''MAME'' menu by pressing '''SCROLL LOCK''' then press '''TAB''' | |||
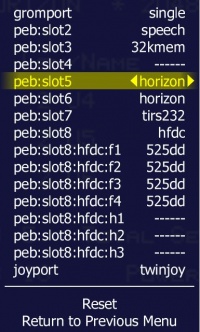
* Configure your '''System Devices''' for your wanted configuration. For this example I will be showing PEB Slot #5 as the Horizon RAMDISK | |||
[[File:1.jpg|200px]] | |||
* '''Reset''' the machine for the settings to go into effect. The default CRU address for the ramdisk is 1200. If there will be multiple HRD's then the CRU address will need to be changed for each additional HRD to a CRU that does not conflict with any other expansion card. | |||
* Bring up the ''MAME'' menu by pressing '''SCROLL LOCK''' then press '''TAB''' | |||
* Select '''Machine Configuration''' to configure RAMDISK installed RAM. | |||
[[File: | [[File:hrd13.jpg|200px]] | ||
* Configure the '''Horizon Size''' to what you would like. | |||
[[File:hrd14.jpg|200px]] | |||
* Select '''Dip Switches''' | |||
[[File:HRD2.jpg|200px]] | |||
* For each of the slots where a Horizon card is plugged in, select '''Horizon CRU base''' option and change the CRU appropriately. If you have more than one card, make sure you use different CRU bases. | |||
[[File: | [[File:hrd3.jpg|200px]] | ||
* '''Reset''' the machine for the settings to go into effect. | |||
* Bring up the ''MAME'' menu by pressing '''SCROLL LOCK''' then press '''TAB'''. | |||
* Select '''File Manager''' to select cartridge and disk images. | |||
[[File: | [[File:hrd11.jpg|200px]] | ||
* Mount the ROS disk image | |||
[[File:HRD4.jpg|200px]] | |||
* Select '''Cartridge''' to load ''Extended Basic'' | |||
''' | |||
[[File: | [[File:hrd5.jpg|200px]] | ||
* Press '''ESCAPE''' twice to exit the ''MAME'' menu. | |||
* Press '''SCROLL LOCK''' to disable the ''MAME'' menu. | |||
* Press '''ANY KEY''' to go to ''TI-99/4A'' menu | |||
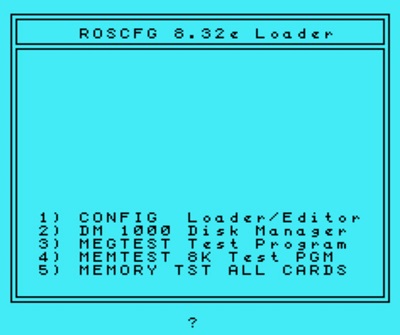
''' | * Press '''2''' to go into Extended Basic and the ''HRD ROS'' Loader should load. | ||
[[File: | [[File:hrd6.jpg|400px]] | ||
* Select '''1''' for ''CONFIG Loader/Editor'' | |||
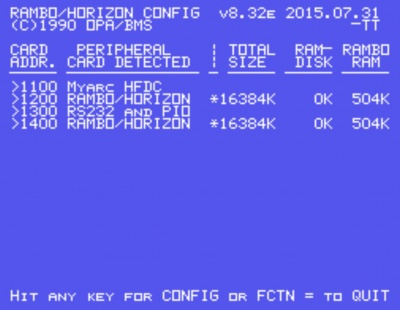
The ROS CONFIG will detect the currently installed expansion cards. The below image shows two Horizon Ramdisks. | |||
'''Note''': The larger the RAMDISK card size the longer it will take to detect the cards. | |||
''' | |||
'''Now the HRD should be accessible. | [[File:hrd7.jpg|400px]] | ||
* Press '''ANY KEY''' to start configuration. | |||
* Press '''L''' to load configuration file. | |||
'''Note''': If using ROS 8.32 or earlier then select the appropriate configuration file for the disk controller installed into the system (Myarc/TI/CorComp). ROS 8.34 has the configuration for all floppy controllers built into one file. | |||
[[File:hrd10.jpg|400px]] | |||
* Press '''E''' to edit configuration. | |||
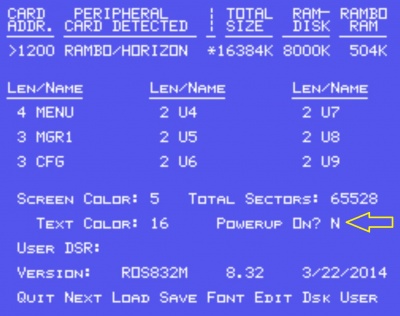
* Keep all defaults but change '''Power Up''' to '''N''' ''(NO)''. To cycle through selections press '''ENTER'''; '''FCTN-9''' when done (ALT+9 in ''MAME'') | |||
[[File:hrd8.jpg|400px]] | |||
* Press '''D''' to configure RAMDISK drive assignments and sizes | |||
'''Note''': Use cusor keys to move different disk drive numbers | |||
* Select Disk Drive # to assign | |||
* Assign a Disk Name of the disk (based on TI Disk Naming criteria) | |||
* Select '''N''' for No Write Protection | |||
* Select '''Y''' to format the drive | |||
* Select sector size | |||
'''Note''': | |||
:1600 max sector size for ROS versions earlier than 8.32 | |||
:3200 sectors size for version 8.32+ | |||
:Drives can be defined from '''DSK1-DSK9''' and '''DSKA-DSKZ''' | |||
[[File:hrd9.jpg|400px]] | |||
* Press '''FCTN-9''' when done (ALT+9 in ''MAME'') | |||
[[File:hrd8.jpg|400px]] | |||
If there is more than one Horizon Ram Disk installed then hit '''N''' for next to configure the next HRD. | |||
'''Note''': The ROS does not verify selected Disk Drive numbers/letters that are already in use. The user will need to keep track of what is in use. | |||
Now the HRD should be accessible. | |||
Revision as of 11:16, 29 August 2016
The Horizon Ramdisk 4000 can be emulated within MESS/MAME up to 16MiB of SRAM. The data that is stored on the RAM Disk is actually saved in the "\nvram\ti99_4a" directory within a file.
Note: The directory is usually classified by the current machine type being emulated. If you use the European version, your directory will be nvram/ti99_4ae.
The emulation will respond to the equivalent speed of the ram disk on actual hardware.
This process was created using MAME0176b 64bit and ROS version 8.32e.
Note: If using ROS 8.14f or earlier, sector sizes will be limited to 1600. ROS 8.32 and higher allows for 3200 sectors per disk.
Procedure
- Boot into MAME and the TI-99/4A ROM
- Bring up the MAME menu by pressing SCROLL LOCK then press TAB
- Configure your System Devices for your wanted configuration. For this example I will be showing PEB Slot #5 as the Horizon RAMDISK
- Reset the machine for the settings to go into effect. The default CRU address for the ramdisk is 1200. If there will be multiple HRD's then the CRU address will need to be changed for each additional HRD to a CRU that does not conflict with any other expansion card.
- Bring up the MAME menu by pressing SCROLL LOCK then press TAB
- Select Machine Configuration to configure RAMDISK installed RAM.
- Configure the Horizon Size to what you would like.
- Select Dip Switches
- For each of the slots where a Horizon card is plugged in, select Horizon CRU base option and change the CRU appropriately. If you have more than one card, make sure you use different CRU bases.
- Reset the machine for the settings to go into effect.
- Bring up the MAME menu by pressing SCROLL LOCK then press TAB.
- Select File Manager to select cartridge and disk images.
- Mount the ROS disk image
- Select Cartridge to load Extended Basic
- Press ESCAPE twice to exit the MAME menu.
- Press SCROLL LOCK to disable the MAME menu.
- Press ANY KEY to go to TI-99/4A menu
- Press 2 to go into Extended Basic and the HRD ROS Loader should load.
- Select 1 for CONFIG Loader/Editor
The ROS CONFIG will detect the currently installed expansion cards. The below image shows two Horizon Ramdisks.
Note: The larger the RAMDISK card size the longer it will take to detect the cards.
- Press ANY KEY to start configuration.
- Press L to load configuration file.
Note: If using ROS 8.32 or earlier then select the appropriate configuration file for the disk controller installed into the system (Myarc/TI/CorComp). ROS 8.34 has the configuration for all floppy controllers built into one file.
- Press E to edit configuration.
- Keep all defaults but change Power Up to N (NO). To cycle through selections press ENTER; FCTN-9 when done (ALT+9 in MAME)
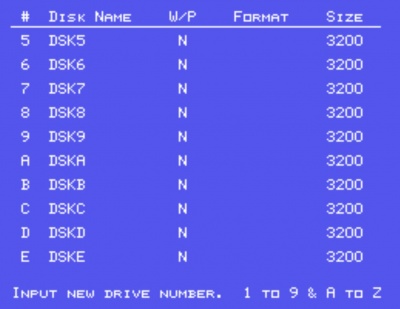
- Press D to configure RAMDISK drive assignments and sizes
Note: Use cusor keys to move different disk drive numbers
- Select Disk Drive # to assign
- Assign a Disk Name of the disk (based on TI Disk Naming criteria)
- Select N for No Write Protection
- Select Y to format the drive
- Select sector size
Note:
- 1600 max sector size for ROS versions earlier than 8.32
- 3200 sectors size for version 8.32+
- Drives can be defined from DSK1-DSK9 and DSKA-DSKZ
- Press FCTN-9 when done (ALT+9 in MAME)
If there is more than one Horizon Ram Disk installed then hit N for next to configure the next HRD.
Note: The ROS does not verify selected Disk Drive numbers/letters that are already in use. The user will need to keep track of what is in use.
Now the HRD should be accessible.
